Creating a campaign tells creators what you need, what you'll pay and when. It's one form in four steps, and nothing is saved until you click the button at the end. A Public campaign then goes live for creators straight away.
Before you start
- There's no Save draft. If you leave the page, what you typed is lost.
- A campaign left on your plan. The Free Plan allows one open campaign. Check Profile Settings → Usage Limits (Get started as a brand shows where).
- A banner image (JPEG, PNG, WEBP or SVG, up to 10 MB), and a profile picture and brand description on your profile. They're optional, but the app warns you if they're missing.
Open the form
Click Create Campaign on Home or on the Campaigns page. A Tips window about cash budgets opens first: click OK (tick Don't show again to skip it next time).
On a computer, Steps 1 to 3 are on the left; Step 4 and a live preview are on the right. The four stages above them only show the road ahead.
Step 1 · Basic Information
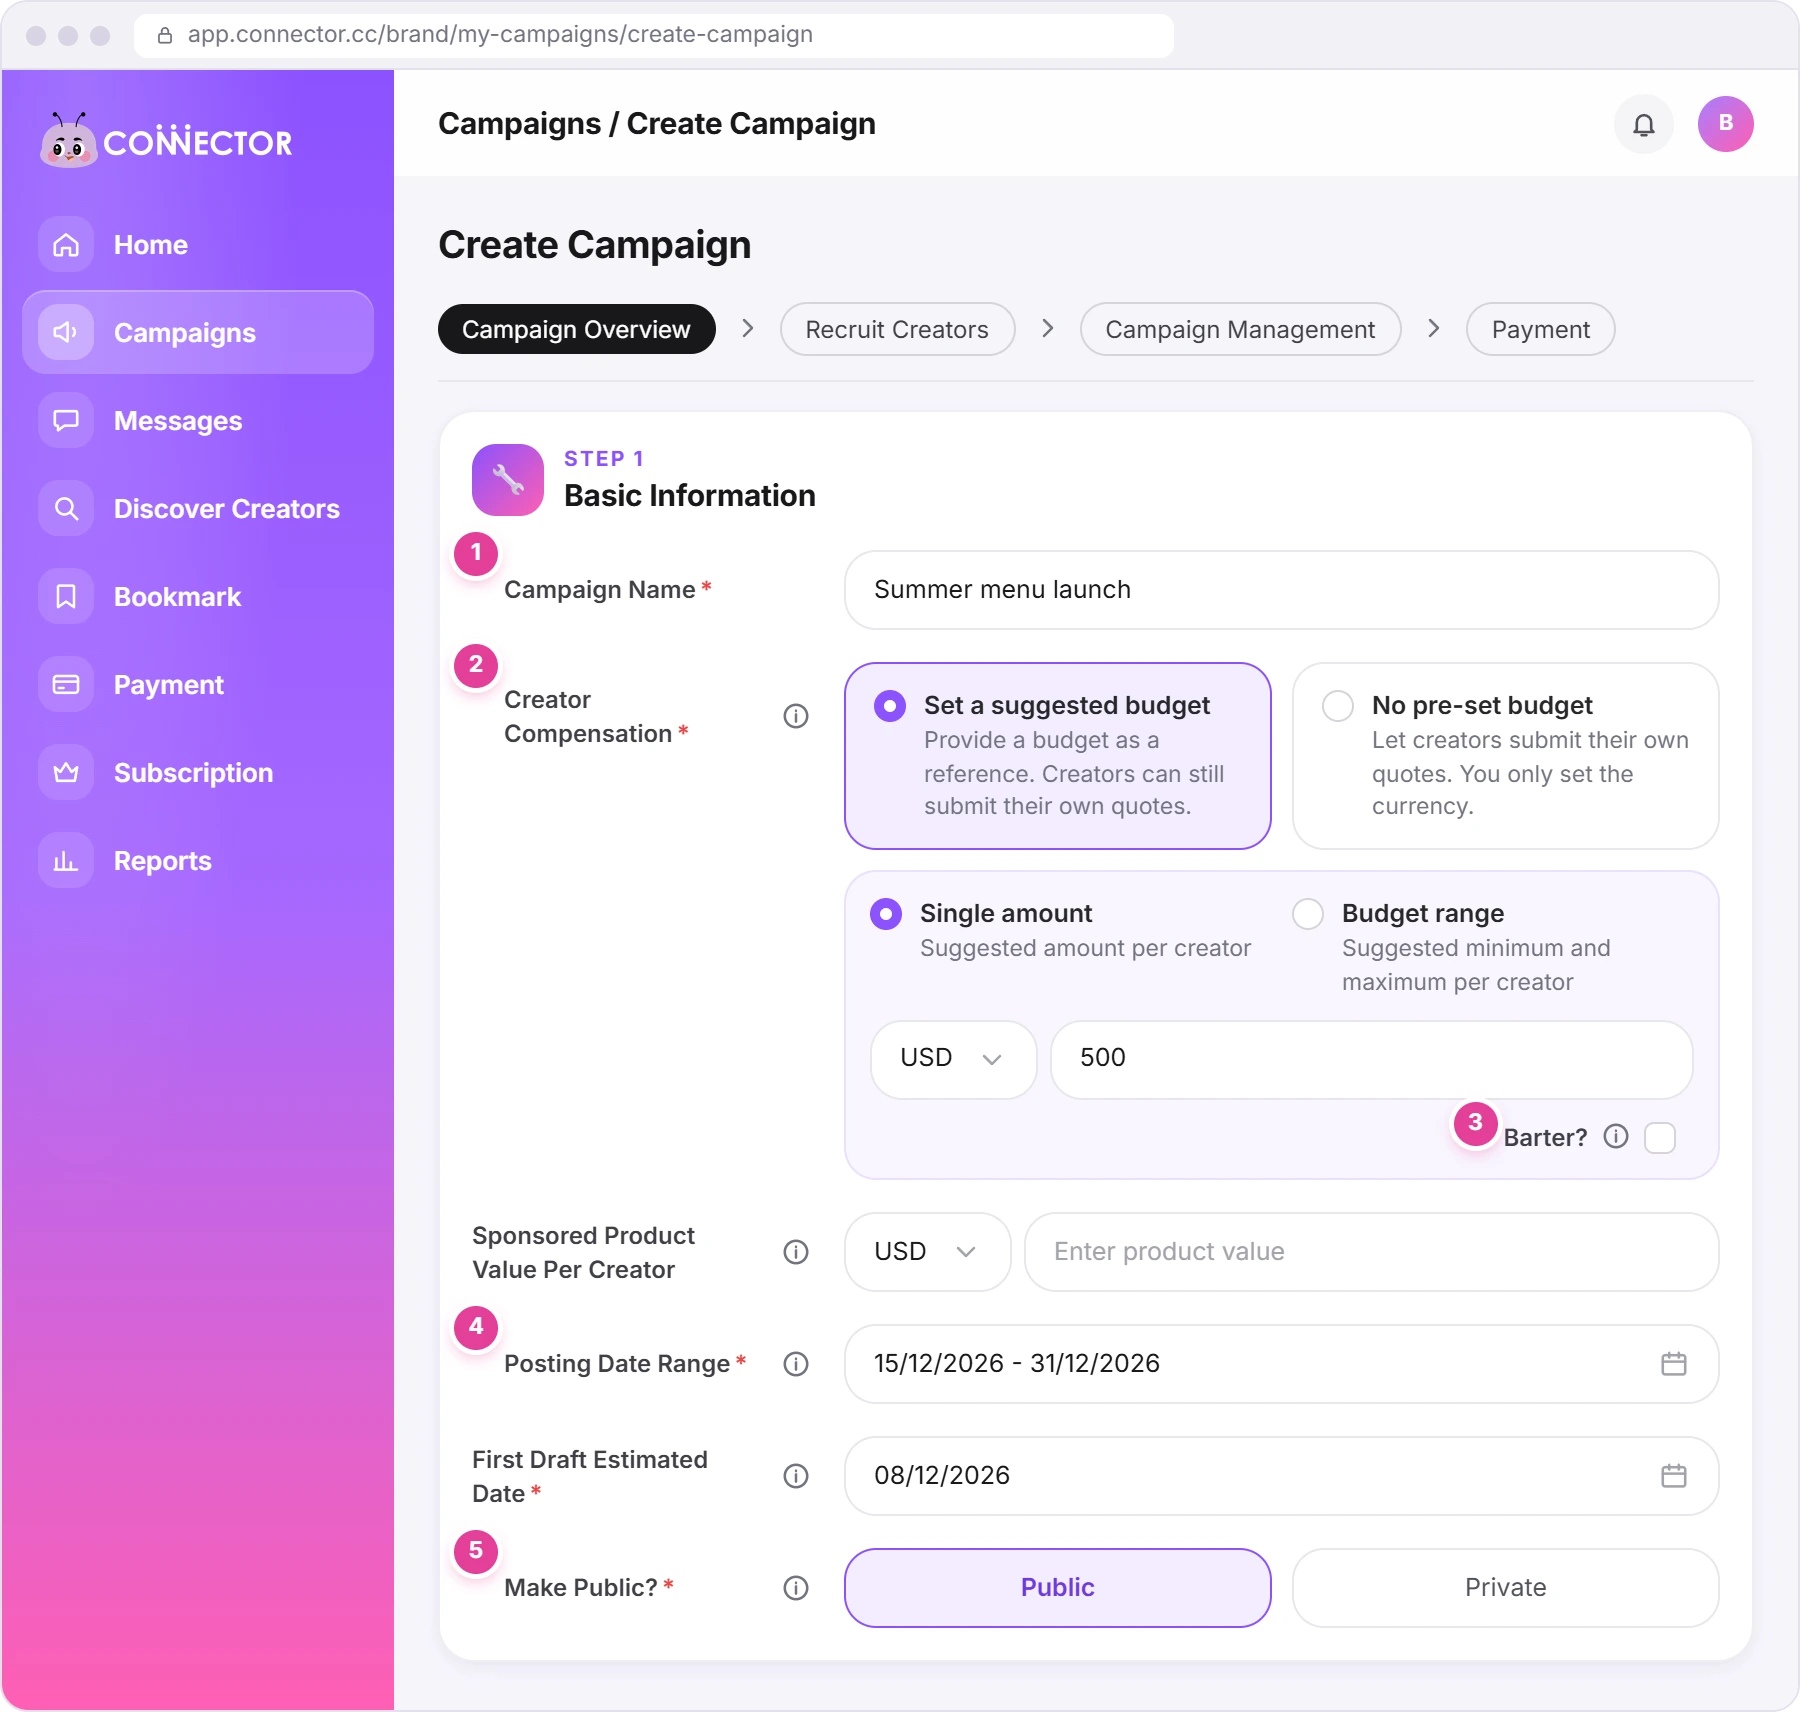
| Field | Required | What to enter |
|---|---|---|
| Campaign Name 1 | Yes | Up to 60 characters. |
| Creator Compensation 2 | Yes | Cash, a product (Barter? 3), or both. See the next section. |
| Sponsored Product Value Per Creator | Only with Barter | The value of the product or service each creator gets. |
| Posting Date Range 4 | Yes | When creators should publish. The start can't be in the past. |
| First Draft Estimated Date | Yes | When the first draft is due for your review: on or before the last posting date. |
| Make Public? 5 | Yes | Public (selected at first) or Private. See below. |
Choose how you pay creators
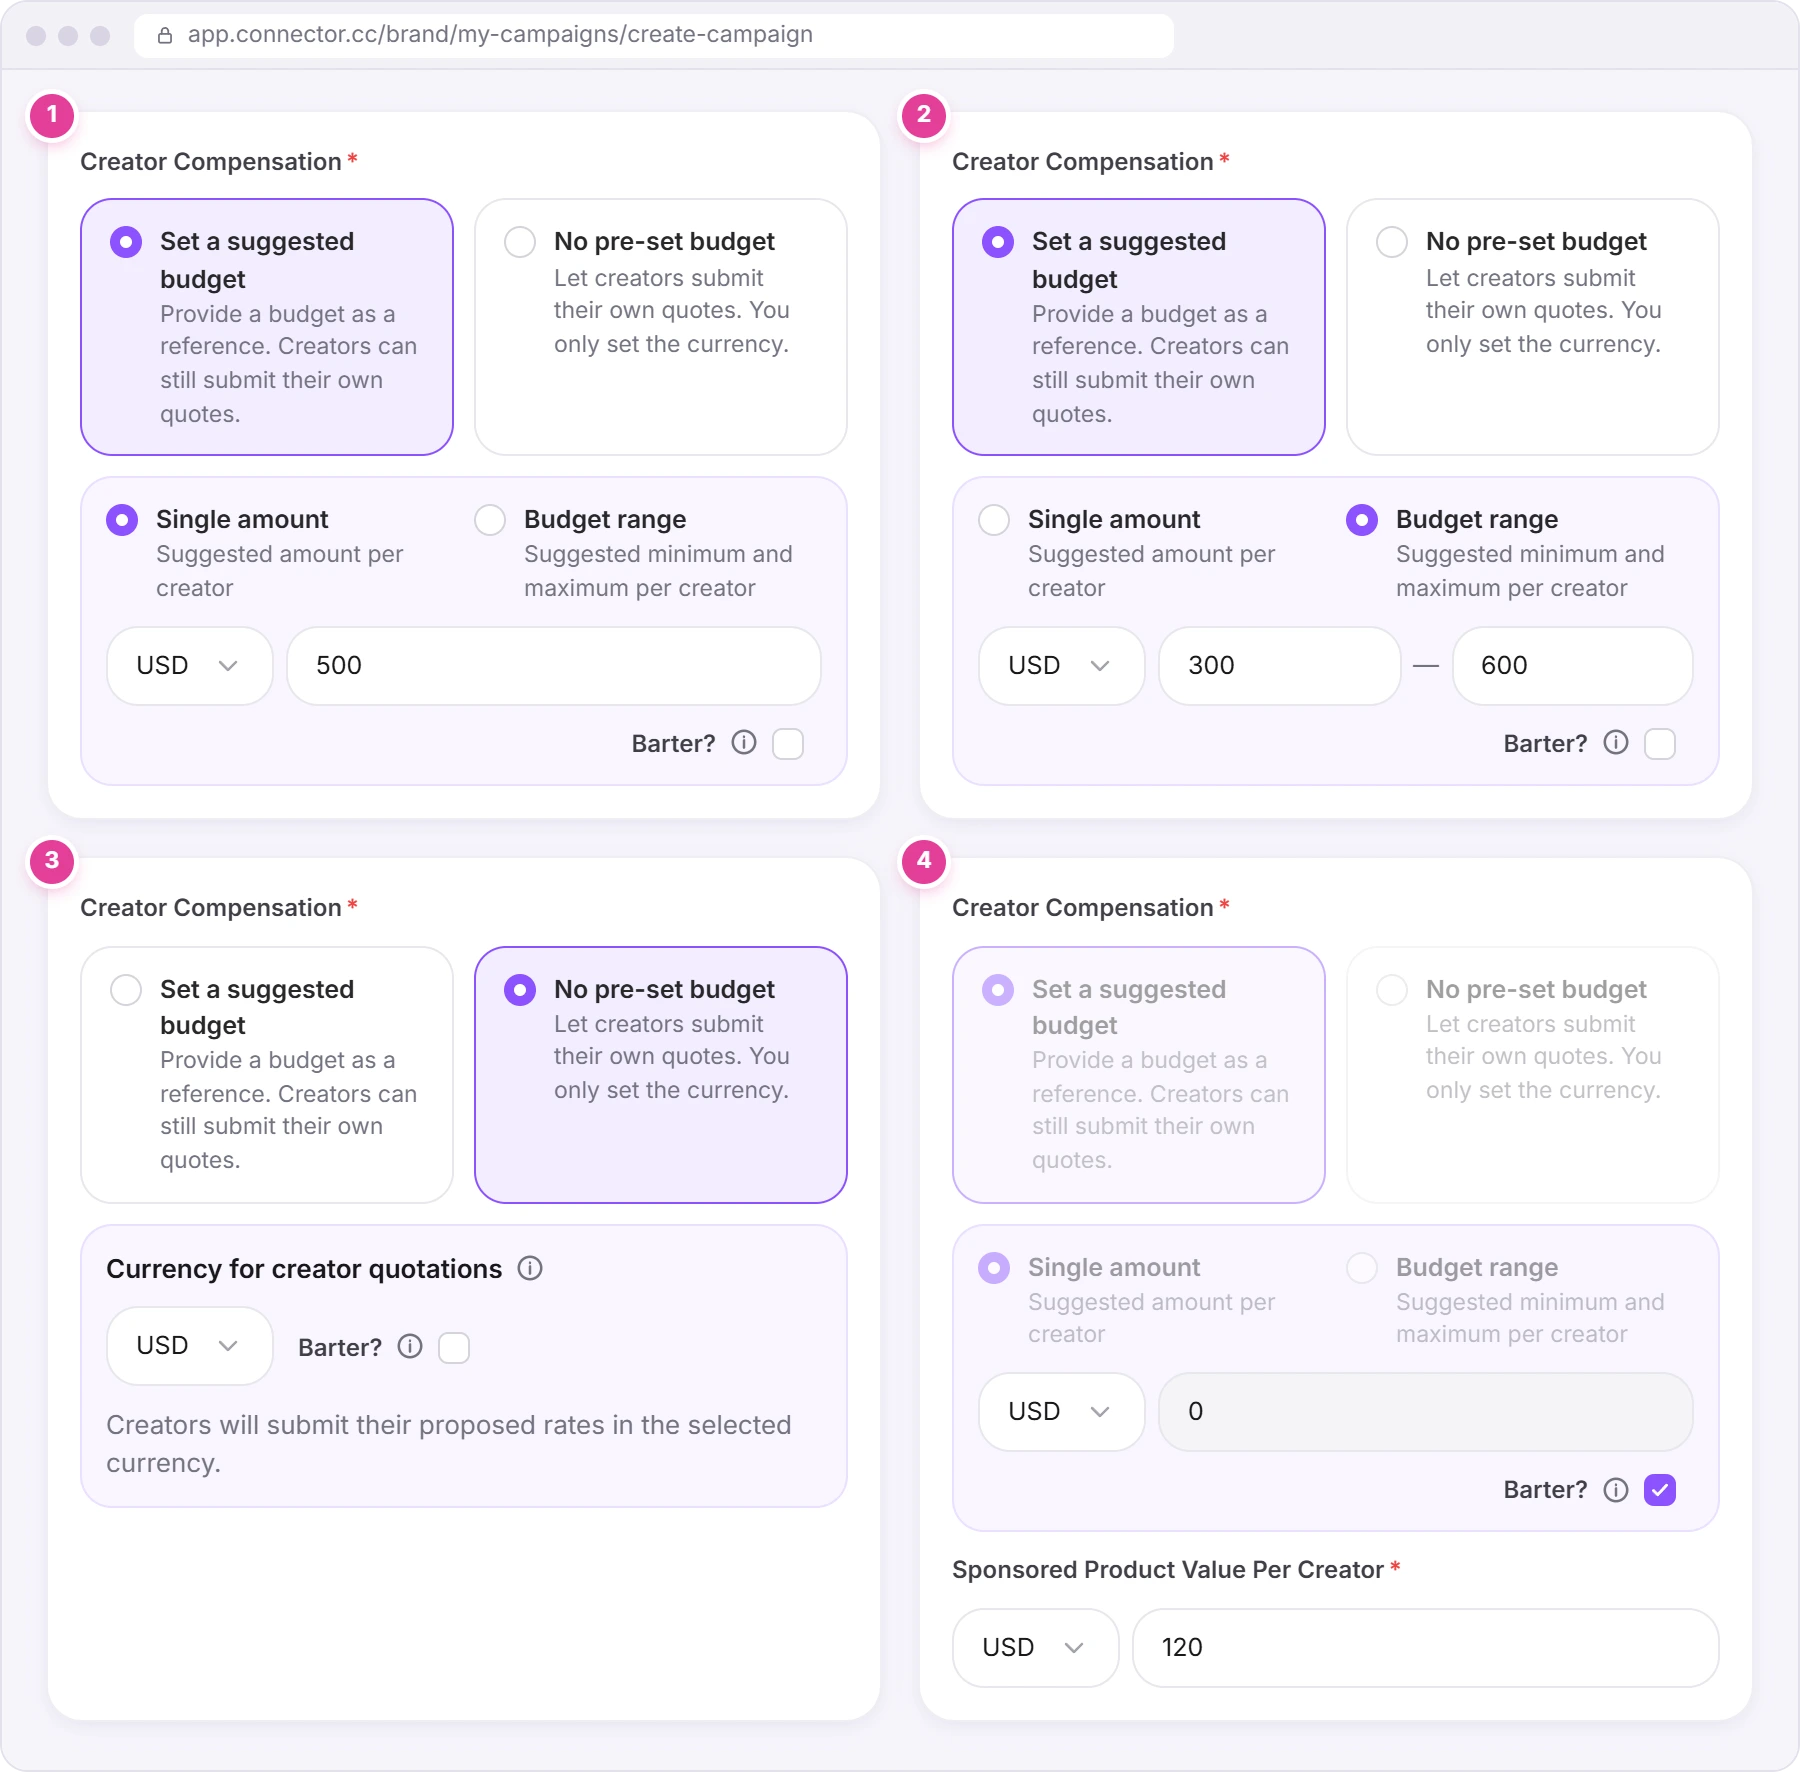
Creator Compensation starts with two cards: Set a suggested budget and No pre-set budget. Under the first, you choose Single amount or Budget range. That makes three ways to pay, plus Barter? for product-only campaigns.
| Option | How it works | Creators see | |
|---|---|---|---|
| 1 | Set a suggested budget, Single amount (selected at first) | One cash amount per creator. It's a suggestion: creators can still quote their own price. | The amount, e.g. "$500 USD", and Cash |
| 2 | Set a suggested budget, Budget range | A Minimum amount and a higher Maximum amount per creator. | The range, e.g. "$300 - $600 USD", and Cash |
| 3 | No pre-set budget | You only choose the currency. Creators send their own rates in it. | "Quote your rate" |
| 4 | Barter? ticked | Product only: the cash amount is set to 0 and greyed out, and Budget range switches to Single amount. Sponsored Product Value Per Creator becomes required (at least 1). | Product Value only |
- Currency: USD, HKD or SGD, one per campaign. Changing it in one place changes it everywhere on the form. Amounts are whole numbers.
- Cash and a product together: leave Barter off and enter both a cash amount and a Sponsored Product Value Per Creator.
- Barter needs the Premium Plan or Pro Plan. On other plans, ticking Barter? opens the plan window and the box stays unticked. The same plans are needed for 0 cash with only a product value; elsewhere you'll see "If you want to create a campaign with zero cash budget, enable Barter".
- No product or shipping fields. Describe the product and how creators get it in your brief (Step 4).
Public or Private
| Public (selected at first) | Private | |
|---|---|---|
| Who sees it | Creators see it on their dashboard and can apply. | Creators don't see it. You invite creators yourself, from the campaign's Recruit Creators tab. |
| The button at the end | Publish Campaign: it goes live straight away | Create Campaign |
Step 2 · Job Information
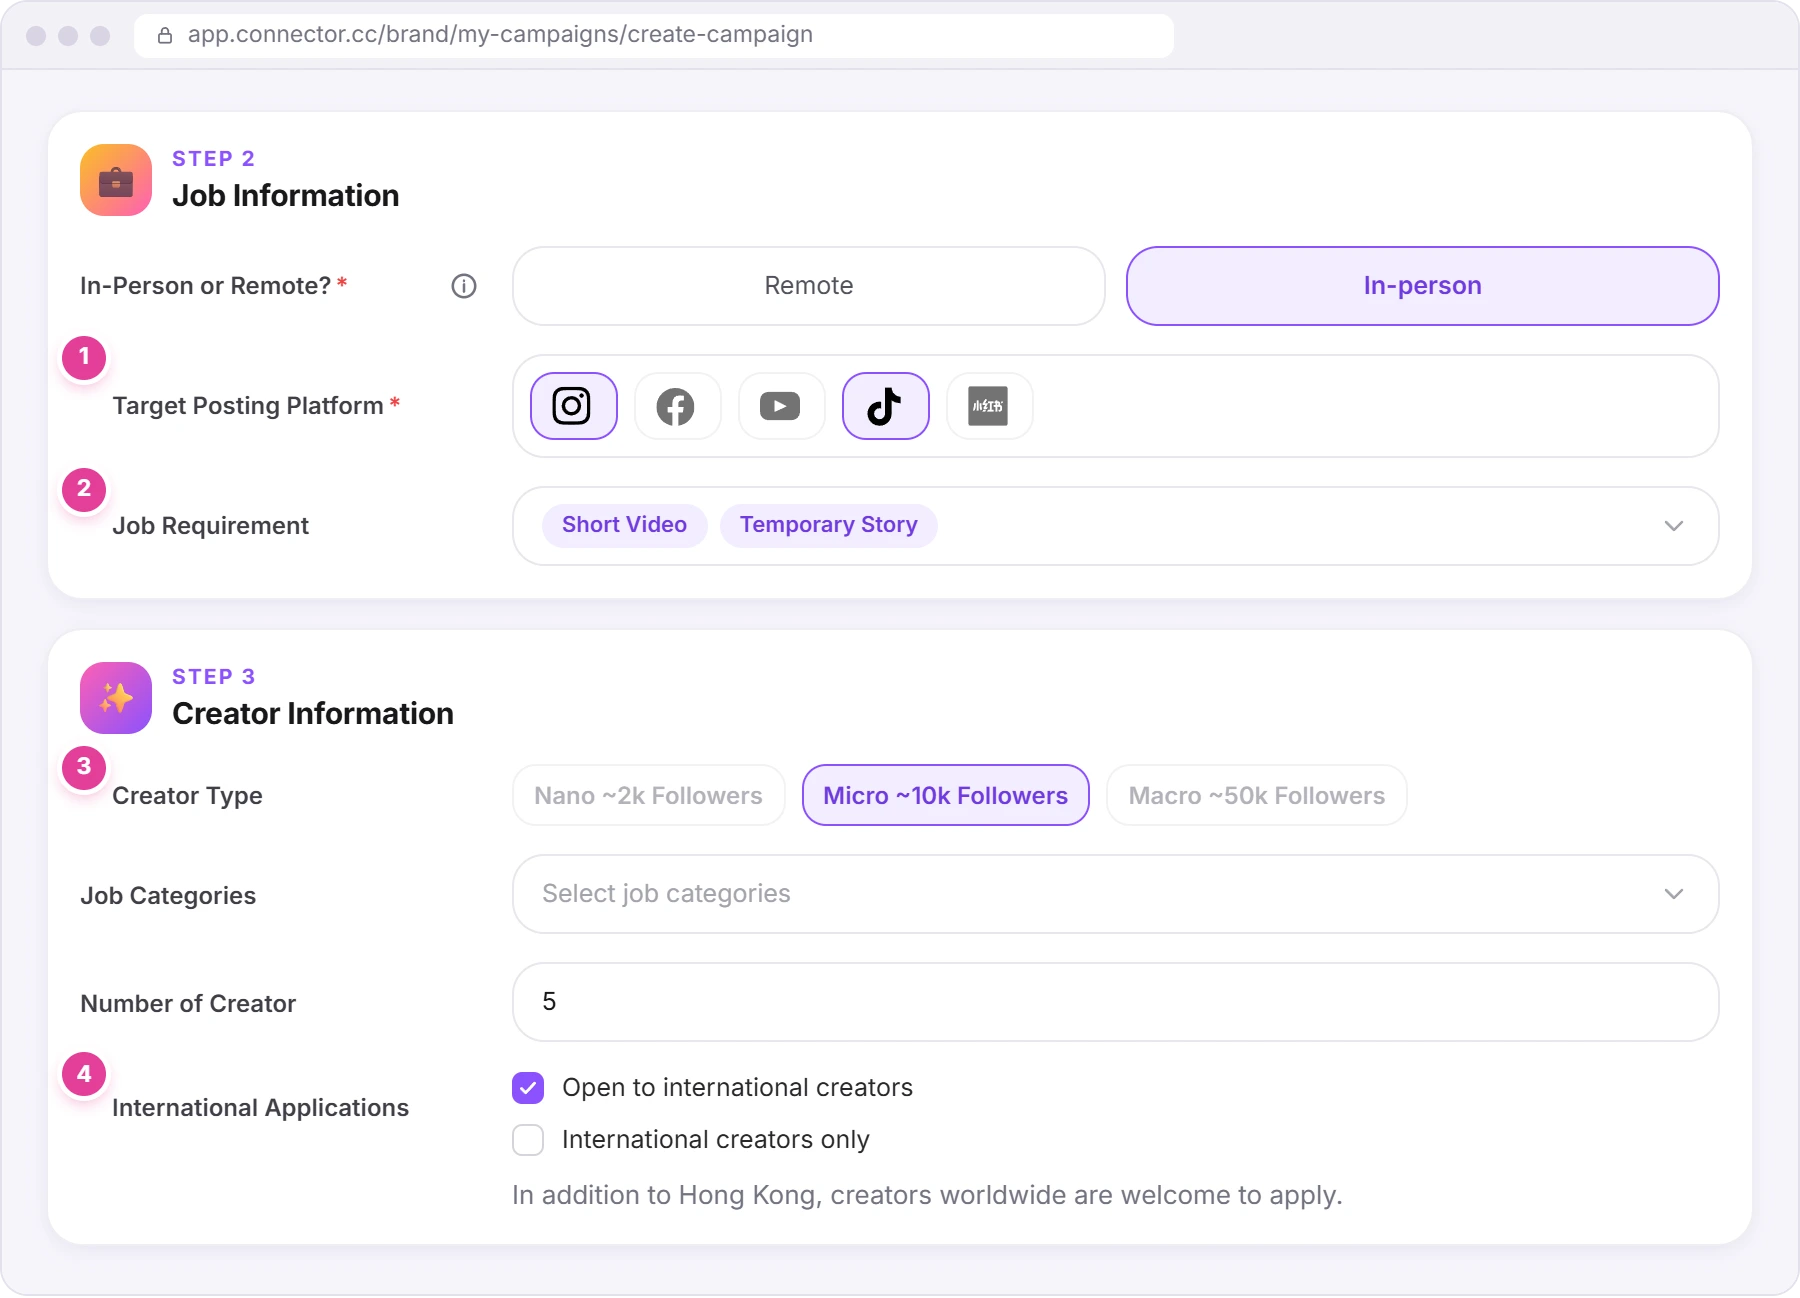
- In-Person or Remote? In-person (selected at first) means the creator must go somewhere, such as an event or a store. Remote means they can work from anywhere.
- Target Posting Platform 1: click the icons of the platforms you want posts on, such as Instagram or TikTok. Pick at least one, or you'll see "Please select at least one platform" when you submit.
- Job Requirement 2: the content you want, such as Static Post, Temporary Story, Short Video or Long Video. It's optional, opens once you've picked a platform, and offers only what those platforms support. If you untick a platform, the choices you already made stay: check them before you publish.
Step 3 · Creator Information
Everything in this step is optional.
- Creator Type 3: Nano ~2k Followers, Micro ~10k Followers or Macro ~50k Followers. Pick up to two.
- Job Categories: the topics your campaign fits.
- Number of Creator: how many creators you'd like, a whole number above 0.
- International Applications 4: tick Open to international creators to welcome creators from outside your country too. A second box, International creators only, then appears for campaigns only for creators abroad.
Step 4 · Brief, AI and banner
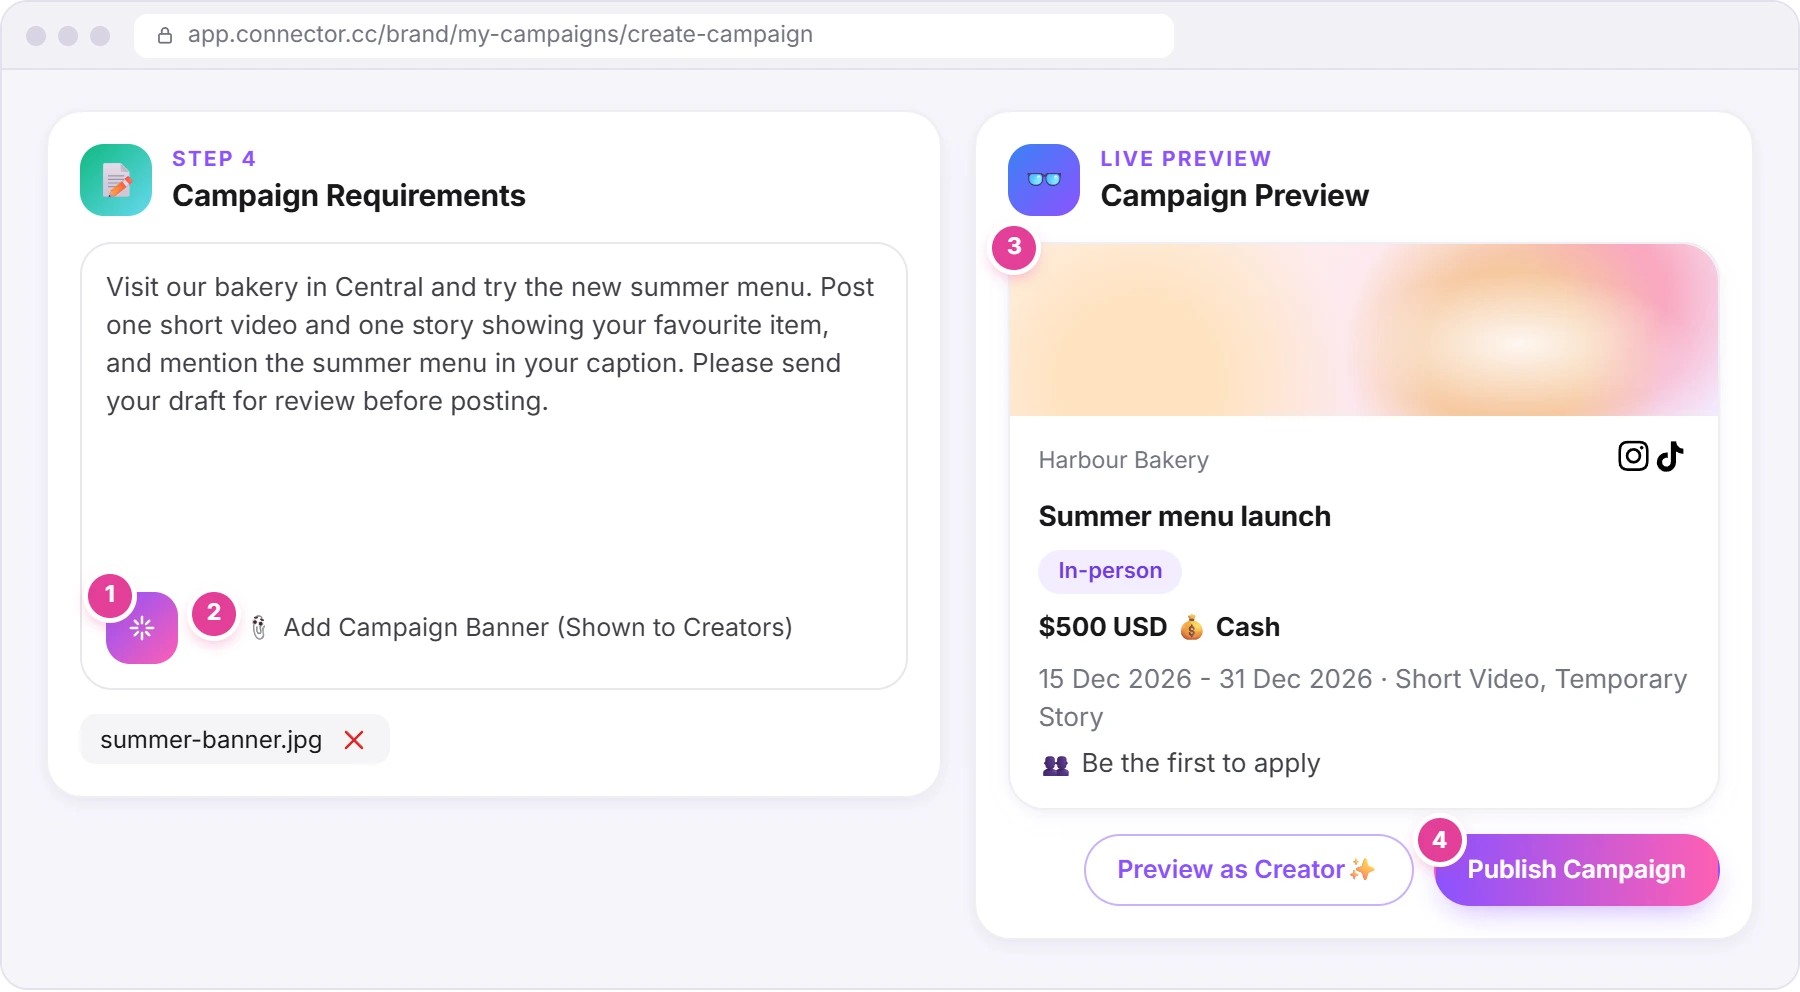
- Write your brief in the Campaign Requirements box. It's required. Line breaks are kept, and links become clickable.
- Or let AI help 1. The AI button under the box writes a brief from your other answers, or rewrites what you've typed. For an empty box, fill in Campaign Name and at least one Job Requirement first: until then the button is greyed out.
- Add a banner 2. Click Add Campaign Banner (Shown to Creators) and choose an image. You can add several, one at a time; each has a red delete icon.
- Check the preview 3: the card creators will see. Click its picture to add a banner, or drag it to reposition it.
- Click Publish Campaign 4, or Create Campaign for a Private campaign.
The AI's text replaces what was in the box. If you had text, a revert button ("Revert to previous requirements") appears in the same row and brings it back, once. Preview as Creator✨ shows your campaign the way creators see it.
Warnings when you publish
| What you see | What it means | What to do |
|---|---|---|
| "Complete Your Profile" | Your brand profile has no picture or no description. | Complete Profile opens your profile settings in a new tab. Add them, come back and click Publish Campaign again. Or click Publish Anyway. |
| "Missing campaign banner" | You haven't added a banner. | Add banner opens the file picker. Choose one, then click Publish Campaign again. Or click Publish Anyway. |
| The plan window (Free Plan), or "You have reached your maximum campaign limit." (paid plans) | Your plan has no campaigns left. | Upgrade (see Get started as a brand), or click Complete Campaign on a campaign you've finished to free its place. |
| Red text under a field, e.g. "Campaign name is required." | That field is missing or wrong. | Fix it and click the button again. |
After you publish
A Public campaign shows "Campaign published successfully" and the Campaign Published page, whose Return to Dashboard button takes you to the Campaigns list. A Private one shows "Campaign created successfully" and goes straight to the Campaigns list.
Next, recruit creators: see Recruit creators and approve quotes.
Change a campaign later
- Open the campaign from Campaigns.
- Click Edit Campaign at the top, there only while the campaign is Running. On a smaller screen, it's the round pencil button at the bottom right.
- Change what you need and click Update Campaign. You'll see "Campaign updated successfully" and go back to the Campaigns list.
Once a cash campaign has hired a creator, its currency is locked. New posting dates still can't be in the past.
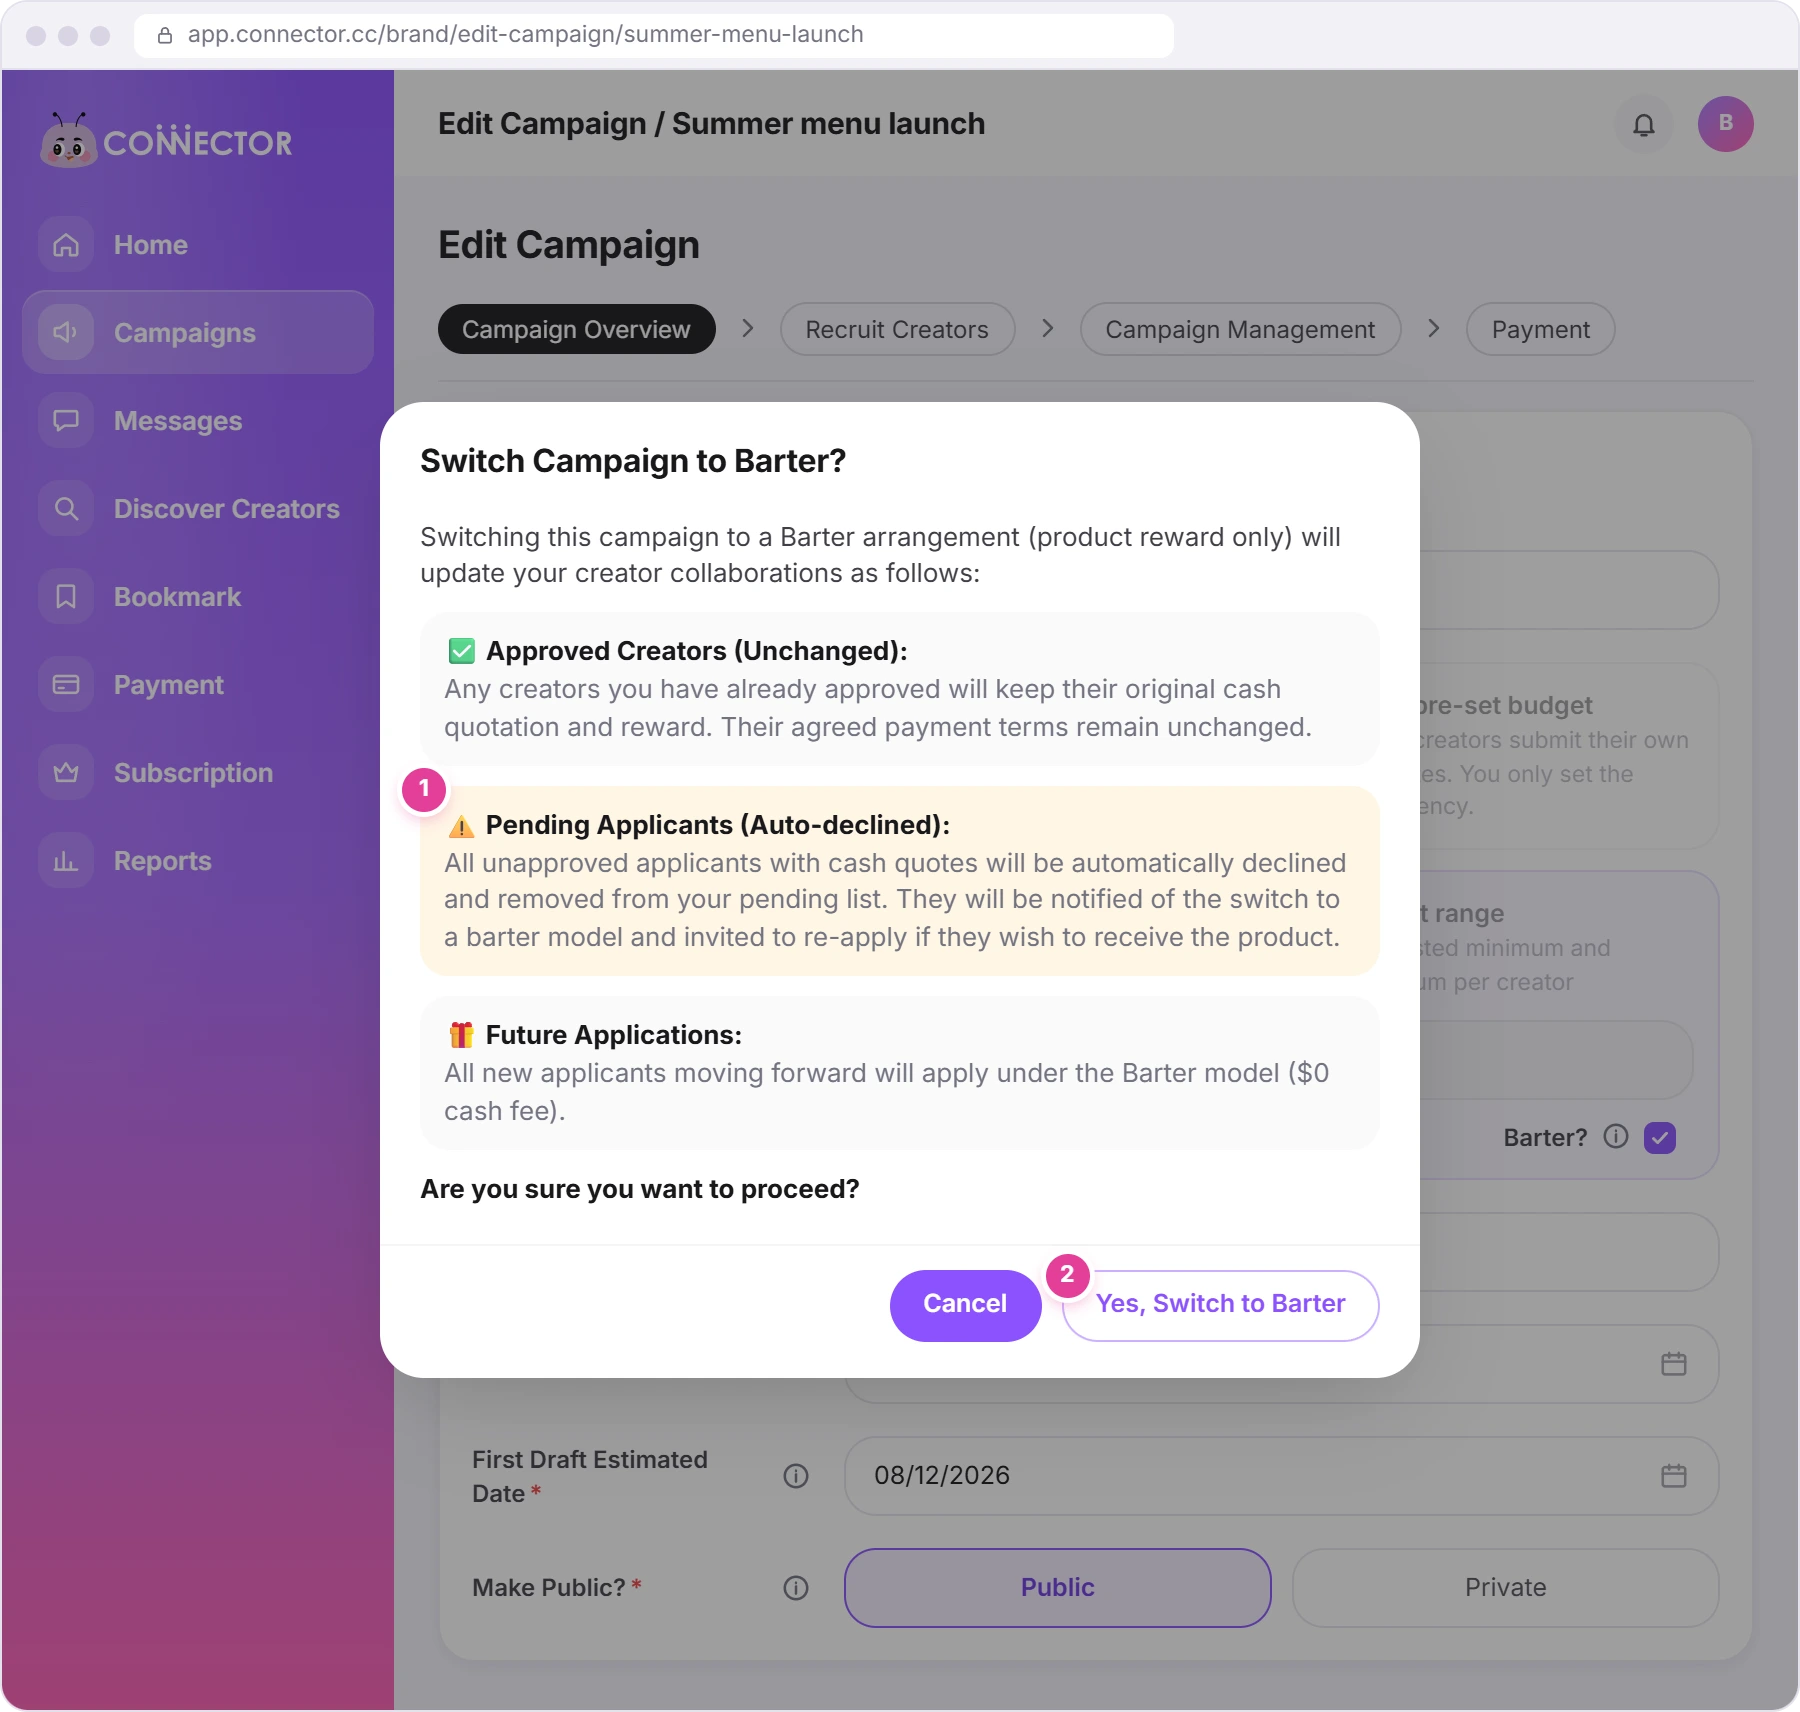
Switching to Barter after creators have applied opens "Switch Campaign to Barter?" when you click Update Campaign. Approved creators keep their cash deal. Pending applicants with cash quotes are declined automatically 1, told about the switch, and can apply again for the product. New applicants apply under Barter ($0 cash). Click Yes, Switch to Barter 2 or Cancel.
To make a private campaign public, open its Recruit Creators tab, then Applicants, and click Switch to Public. The campaign form opens there: choose Public under Make Public? (it doesn't change by itself), then click Post Campaign Ad.
To pay a hired creator more, click Increase cash budget in their side panel. Payments, invoices and saved cards explains how, and what it costs.
Did this answer your question?
Thanks. It helps us know which guides work.
Sorry about that. Tell us what was missing and we’ll answer you and fix the guide. WhatsApp us